Showing posts with label DIY. Show all posts

DELIGHTFUL DUCKY DO

Last weekend my sister Sarah's baby shower  arrived and we were finally able to implement all of her ideas for a gorgeous blue and yellow themed rubber ducky shower. She had some really lovely visions of this day and had enlisted me to help her achieve them.  I designed all the invitations, labels, signs, cupcake toppers and iced the cupcakes. While Sarah put her hand at making and icing her very first fondant cake - a chocolate mud cake decorated in cute ducky bubble style (pictured below). She did such an amazing job. Not only did it look absolutely gorgeous, it tasted so incredible it still makes my mouth water almost a week later!

We shopped for most of the decorations together - though it was Sarah and her husband that decided to start hanging them around their house in the days leading up to the shower, so as not to have much left to do on the day. Sarah also wanted to hand make a bunting, as she had a specific style in mind. Once again, she did it with finesse and it looked amazing (take a look below)!

I'm so proud of how the day turned out. It was such a lovely day to celebrate the anticipated arrival of a very special little boy. I for one can not wait to meet this little guy!

Sarah, you are such a special lady and I really do love you so much. You are the most beautiful mama-to-be and you are going to be a fantastic mother.


MINI RENO: KITCHEN

I've decided what my next project will be... a mini-renovation of our kitchen and I wanted to share my thoughts and moodboard! I'm really excited about doing something with our somewhat bland 90's decor, and although I would absolutely love to start from scratch with a brand new kitchen - it really isn't something we can afford right now. Besides, I think over the past 5 years I've developed a wee fondness for this trusty, sand-coloured space.

My mini-reno will consist of a re-hung and newly painted sliding door that seals off the kitchen from the hallway. However, this paint job will be done with chalkboard paint and essentially creating a giant chalkboard to adorn with ever-changing art (see image above). I will also hunt down, create and purchase various items to decorate the kitchen. I love the juxtapose of old/traditional with new, which I will endeavor to apply to my 'in-between' kitchen!  I even have a little idea to spruce up our old fridge - but I'll just see if it works first! I'm really in love with the colour mint at the moment, so luckily for me it ties in with the existing sand coloured kitchen and walls. I will also maintain some elements of black and white which will give cohesion with the rest of our (already refurbished) home. Here are some 'before' pictures... I didn't quite manage to get one before the sliding door came off, oh yeah, and excuse the mess, I'm sure you can understand with a 15 month old running around!


IN THE MOOD FOR SOMETHING NEW

You may have noticed a new little look going on for Carousel Ponies. Yes, I'm in the mood for something new creatively, starting with CP.  A wee bit cleaner and fresher, it's been on my to-do list for quite a while, but finding the time to do it was a bit of a challenge. All things aside though, it's here now and I'm rather liking it (hopefully you are too!).

But my latest buzz of creativity doesn't end here. Lately I've been drawn to DIY home renovations. Not big revamps - just the little kind that turn an ordinary space into a place with a bit more personality, whether that be by simple adornment or clever use of paint. I haven't decided what project I'm going to embark on yet, however I've been gathering ideas and 'pinning' like mad all kinds of wonderful and beautiful things that I hope will inspire me.

Here are a few ideas I've gathered. I'd love to hear your thoughts or suggestions. Even better, share your DIY project!

A. Painted bottles and glasses DIY or DIE - Elle Interior  B. Kitchen Jars and Labels The Painted Hive C. Painted Corkboard The Happy Home D. Chalkboard Painted Fridge Pure Style Home


ONE

I can't believe my little one is 1. The year has flown by and I can honestly say it's been the best year yet! Summer brings so much joy into our life and we look forward to many more years watching her grown into a little lady.

Here are a few snaps from her 1st birthday, 'Summer-themed' celebrations. It was a heap of fun making fan-circles and tissue pom-pom decorations and fruit filled cones, but my favourite of all was the vanilla flavoured sandcastle cake I made, with vanilla glaze and vanilla biscuit crumbles... mmm vanillary!


IT'S BEGINNING TO LOOK A LOT LIKE CHRISTMAS


Since December 1st I've been on a Christmas decorating frenzy. I decided this year I wanted a Red+White theme. Red is such a warm, friendly and inviting colour - embodying all that is Christmas - and I love it in contrast with crisp white. Here's a few Christmas pieces I either made or purchased  for a pretty wicked bargain.

a. Rather plain white santa stockings purchased from The Warehouse for $5ea. I decorated each with ribbon and wooden letter initials that I bought from an emporium for a few extra dollars. b. Christmas wrapping was a combination of ribbon purchased from The Warehouse, left over paper doilies from my 30th, then topped off with a hand drawn 'doodle' style gift tag. c. Using frames I had from my 30th, I designed up some simple Christmasy art, pushed print and framed... tada. d. My favourite of all, some christmas crackers I made using left-over red card and this template. Each cracker is personalised with a name tag and special gift inside. e. I love this wooden Peace decoration that I purchased for only $6 at Kmart.

A LIL SOMETHING FOR SUMMER


Finally! I'm back to the blog. I really don't plan to leave it this long between posts, however, I'm here now and introducing my latest finished project... Summer's 1st birthday invitation. Can you believe she's nearly 1 already? Technically she's 1 in late December - but we've decided to celebrate this special occasion in January when there's a bit more 'space', so-to-speak.

Naturally, we're throwing Summer a 'Summer' party, encompassing all things summery. So a cute, little popsicle invitation fit the bill perfectly.

Complete with handmade, scalloped edge, outer wrapper (machined sewed at one end) and double-sided popsicle - I admit that making these little suckers was no easy task. Halfway through  the 30 odd amount I needed, those dollar store party invites didn't seem like such a bad idea... Needless to say, I soldiered on and I'm really happy with the finished product.

Somehow, I don't think I'll put in quite as much effort for birthday number two. However, I just HAD to for the first one! Now, to distribute them...
 

THIRTY

Well, it really has been a while since I last posted. Sorry about that. There has been so much on lately and I really didn't think I would abandon my blog for this long. However, real life called.

But now that I'm back, the first new post (of the few I intend to write!) is on my ever-anticipated Thirtieth Garden Party.

Hmmm, it was rarely a 'Garden' party when we had to move everything indoors due to the unsurprising, less-than-perfect Auckland weather. However, things did clear up enough for us to open the french doors and spill onto the patio towards the end.

Despite the weather predicament, I must admit I had a wonderful time setting up my 'Indoor Garden Party' complete with custom-made teepee for the children, 12 metres of bunting flags, handmade paper pom poms, lanterns, retro props, white garden chairs and picket fence! Not to mention the cupcakes, birthday cake (with bunting of course!), finger sandwiches, kids bubbles and adults sweet packet favours - all of which I lovingly created - and had a ball doing!

A major thanks goes out to my Mum and Mum-in-law for organising and co-ordinating all the hot food, bringing yummy treats to contribute to the spread and, of course, cleaning! Most definitely couldn't have done it without those two. Love you guys!

My gorgeous sister-in-law was able to capture the occasion with these pretty shots. Take a look.


PROJECT OFFICE COMPLETE... NEARLY


Well, I've been a busy girl! On Saturday Matt took to the track to tune his race car, so I was able to get stuck in to reclaim the office. I was surprised at how quickly I was able to get everything in order and how handy I was a re-wiring our stereo system! I started at 10am and by 12pm the majority of work was done. I guess having a fairly blank canvas, and reasonably organised 'stuff' helped in that regard. Summer spent the time lounging on the floor with a pile of toys while I sung her favourited songs and did embarrassing little dances to keep her entertained. My overall theme is clean and simple with bright bursts of colours to break up the monotony, creating an (hopefully) inspiring space. I have a big blank canvas to adorn that will hang above the sofa. I'm still deciding what I'll put on that puppy, but no doubt something that will add another 'colour pop' to the room.


Above the computers I plan to hang a cork board that I can pin various bits and pieces for projects I am working on. I would also love to get a cool, large coffee table to place in front of the sofa, that I can used to lay out, organise and work through projects.


Still a few touches needed here and there, but the bulk of work has been done. I am now the proud owner of a nice, new work space and I'm excited to start using it!

IT'S MY PARTY... SOON


It's 2 months away, but I seriously can't wait! I absolutely love planning parties. Everything from the food, to the decorations, to the invitations, to the music... I love it all. Needless to say, I haven't been able to hold back on my own 30th birthday preparations. With a baby now in tow, I decided if I want to do a good job with my party planning, I need to start early. So I started researching for invitation ideas... and before you know it I'd actually made, printed and complied over 40 invites! Now I'm going to have them sitting around for another month before I can actually send them out. However, I couldn't wait to share them with you. Made from printed textured card, then wrapped around with paper doily (cut and glued to fit), then finished off with cotton twine and cute doily personalised name tag. Keep an eye out, you may receive one in your post (or in person) soon!

As well as the invitations, I've also been on the lookout for various 'Garden Party' items. So far I've collected various doilies, both paper and cloth, from dollar stores and opshops. I've also various fabrics to complete my strings of bunting flags (I need to make 12 metres!), tissue paper for paper pom-poms, rice paper balls, old suitcases... the list goes on! I've been fortunate that a few members of the family have unearthed nice old treasures that I can borrow for the day. However, I was really excited to come across this little birdcage candle holder (below) in a dollar store and just had to buy it! I'm going to paint it white/cream to match my theme.

Well, that's it for now – just a few little things that I just couldn't wait to share.

MAKING A MARK

I've been on a creation buzz lately and it's starting to extend to making gifts for my friends and their new arrivals. So I thought I'd design a little stamp for myself, like a signature for my gifts.

Recently some friends of ours gave birth to a beautiful little girl, Olivia Jane. I had started making a Daisy Doe (like Summer's one) a few months back in anticipation of her arrival, personalising to tie in with her nursery. I also wanted to create a personal tag to go with it, and decided my stamp would makes it's debut here. This is the result.


MEET CHI-CHI


Meet Chi-Chi Chiuaua… at little creation I made over the past couple of days. She is my first attempt at designing my own softie pattern, and I'm reasonable happy with the result. There are a few tweaks needed here and there, such as the head being a wee bit tall and the back of the neck needing slight modification. But all in all, not bad for a first attempt (if I do say so myself).

I may give it another go with a modified pattern if I get the time and give Chi-Chi a little friend. But that's for another rainy day.


- MUMMY MADE -

Well, I haven't blogged in a while... I've been a little tied up! Summer has suddenly decided day naps are not for her and I'm constantly fighting a battle to get her to take naps. However, somehow I managed to whip up a little dress for her with the left over material used to make some of her toys. Now she matches her room! I didn't use a pattern... just fudged my way through it! But I'm pretty happy with the outcome.

- A PRACTICAL PIECE -


Ok, so I thought I had made my final baby-related object before her arrival... but turns out I was wrong!

After meeting with a friend (and brand new mum) last week, she mentioned how handy these breastfeeding pillows are. I had seen them before, but figured I would just make do with standard pillows. However, after watching her breastfeed her little one, I could see how well they worked and decided I wanted one too. I automatically just thought I'd buy one, but while lying awake in bed one night (quite a common occurrence these days!) the thought hit me to just make one. "Hmmm, but I wonder if it would be cheaper and less hassle to just buy one though?" I thought to myself. So I set off on a mission to see if I could find one I liked and researched the prices. I was surprised to discover that there weren't a lot of options and the most inexpensive version I could find was $30... and in a hideous pattern! I have luckily inherited a bag full of good quality stuffing from my brother that he had used as 'snow' for a Christmas work display a few years back, so I knew all I needed was some fabric and I was away. I found some really nice beige striped fabric from Spotlight and even found a free pattern to download from here. It only took about 1 hour to make and cost the grand total of $12.99!

The cool thing about this type of breastfeeding pillow is that you can use it as a nice support for baby when they're learning to sit a bit later on (as demonstrated by Ted in pic 2).

Pretty please with myself if I do say so!

- NESTING -

Well, I've finally finished work and with 3 weeks to go before my estimated due date (EDD), nesting is in full swing!

I've got this sudden urge to clean and organise. For goodness sake, I even cleaned and vacuumed the car the other day… I hate cleaning cars!

Amongst the rapid frenzy of housework, I've also been enjoying making and crafting things. It's something I've always loved to do, but never had the time, and now it's rearing it's creative head. I'm fully embracing this rare (and somewhat limited) opportunity to get crafty with this years christmas wrapping and create cute little toys for bubba.

My latest creation is a little deer softie in the shades of bubs room. I call her Daisy Doe. It was so much fun creating this little creature and I'm really happy to add her to our wee girls ever growing collection of soft and furry friends.


I'm also stoked to say I have purchased all the family's christmas presents… 4 weeks early! This has given me time to creatively wrap each gift with handmade personalised tags, christmas silhouette cutouts and finished off with 'so-hot-right-now' bakers twine. I'm going for the 'crafty' theme this year and I'm quiet happy with the result.

- THE BABY ROOM PART II -


So a few weeks ago I summoned my hubby to put together this wardrobe fitout for our little girl. As we don't have much space for further stand-alone drawers and cupboards, I wanted to ensure the double wardrobe would accommodate everything we needed in an organised and manageable way. I knew I wanted to use a combination of baskets and shelves as I love the way they can be easily moved around and changed as our needs do. It's also very exciting to have this wardrobe done in time to put all the cute new stuff we got from friend and family for our baby party. Thanks guys!

- LET THE FUN BEGIN -


With a fun pink and red circus theme, we treated our baby party guests to butter and caramel flavored popcorn, vanilla cupcakes with cream cheese icing, sweets, treats and other carnivally fun food.

I had SO much fun gearing up for this party. From making little signs to sewing a string of bunting flags, to collecting cute vintage popcorn boxes and making trays of cupcakes. Overall, I was really please with the outcome. Sure it's a pretty girly setup… and, dare I say it, rather 'baby shower'esque', for a mixed gender celebration, however, that's where the fireworks and explosives came in. Boys will be boys, sigh:)

Good music and great friends completed our evening and the night was such a fantastic way to celebrate the upcoming arrival of our little girl. I can't believe we only have 7 weeks left! Yikes!

- THE BABY ROOM -


I'm so excited to share our baby's room so far. It's been a work-in-progress for a while, having started kitting it out about 4 months ago! I wanted to start early so I could bargain hunt and have time to create the perfect environment for our precious bundle. The first purchase was the cot which I managed to score second hand, in mint condition, off TradeMe for $250 (innerspring mattress included). The following additions were the bucket chair which I had recovered in fabric from Spotlight, followed by a cute cube draw unit and new moses basket and stand… all great scores from TradeMe!

Starting so early meant we didn't know the gender of our baby, but I had decided I wanted the basis of the room to be neutral anyway, with a touch of gender-specific colour once we knew. After we found out we were expecting a little princess I added dusky pink to the mix.

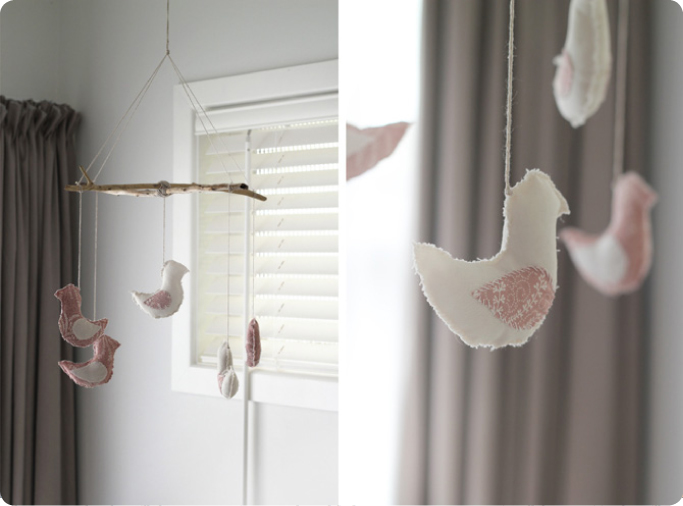
I've had a heap of fun creating unique pieces for bubba's room. I handmade the birdie mobile which comprises of beach wood from our nearby bay, while owly and the bunting flag cushion are also handmade originals. Note the 3-piece framed art I created with a carousel pony in the middle! The room is a tad sparse at the moment - but that will change as I continue to make and find new treasures, not to mention all the necessities that will no doubt infiltrate the room shortly!


- THE BABY PARTY -


I'm so excited to be having a baby party in a month. I have so many plans for it and I know it's going to be awesome.

When I say 'Baby Party', I don't mean 'Baby Shower' either. I've never been into the age-old baby shower tradition where a bunch of gals get-together and play 'baby games' and sip tea... but I HAVE always loved a good party... so my husband and I decided to do a baby party instead. We have combined it with a fun-filled Guy Fawkes night where friends and family (guys included) will come to eat, drink and generally have a good time - no chocolate diapers insight!

However, I don't plan on throwing away the cute cupcakes and decorations. I'm currently working on some cool creations for the night that will add to the ambiance of the evening as well as a kick-ass playlist that will get all in the party mood!

Check out our invitation above.